Spring Cloud是一个基于Spring Boot实现的云应用开发工具,它为基于JVM的云应用开发中的配置管理、服务发现、断路器、智能路由、微代理、控制总线、全局锁、决策竞选、分布式会话和集群状态管理等操作提供了一种简单的开发方式。
Spring Cloud包含了多个子项目(针对分布式系统中涉及的多个不同开源产品),比如:Spring Cloud Config、Spring Cloud Netflix、Spring Cloud CloudFoundry、Spring Cloud AWS、Spring Cloud Security、Spring Cloud Commons、Spring Cloud Zookeeper、Spring Cloud CLI等项目。
服务发布与消费
创建服务注册中心
创建一个基础的Spring Boot工程,这里命名为srpingcloud-eureka,并在pom.xml文件中添加以下依赖:1
2
3
4
5
6
7
8
9
10
11
12
13
14
15
16
17
18
19
20
21
22
23
24
25
26
27
28
29
30
31
32
33
34
35
36
37
38
39
40
41
42
43
44
45
46
47
48
49
50
51<parent>
<groupId>org.springframework.boot</groupId>
<artifactId>spring-boot-starter-parent</artifactId>
<version>1.3.5.RELEASE</version>
<relativePath />
</parent>
<properties>
<!-- spring-cloud版本号 -->
<spring.cloud.version>Brixton.SR5</spring.cloud.version>
</properties>
<dependencyManagement>
<dependencies>
<dependency>
<groupId>org.springframework.cloud</groupId>
<artifactId>spring-cloud-dependencies</artifactId>
<version>${spring.cloud.version}</version>
<type>pom</type>
<scope>import</scope>
</dependency>
</dependencies>
</dependencyManagement>
<dependencies>
<dependency>
<groupId>org.springframework.boot</groupId>
<artifactId>spring-boot-starter-test</artifactId>
<scope>test</scope>
</dependency>
<dependency>
<groupId>org.springframework.cloud</groupId>
<artifactId>spring-cloud-starter-eureka-server</artifactId>
</dependency>
</dependencies>
<build>
<finalName>springcloud-eureka</finalName>
<plugins>
<!-- 设定maven所用jre版本避免maven update project时项目jre变为其它版本 -->
<plugin>
<groupId>org.apache.maven.plugins</groupId>
<artifactId>maven-compiler-plugin</artifactId>
<configuration>
<source>1.7</source>
<target>1.7</target>
<encoding>UTF-8</encoding>
</configuration>
</plugin>
<plugin>
<groupId>org.springframework.boot</groupId>
<artifactId>spring-boot-maven-plugin</artifactId>
</plugin>
</plugins>
</build>
启动一个服务注册中心,只需在Spring Boot的启动类中添加@EnableEurekaServer注解:1
2
3
4
5
6
7
public class EurekaApplication {
public static void main(String[] args) {
new SpringApplicationBuilder(EurekaApplication.class).web(true).run(args);
}
}
默认情况下,该服务注册中心也会将自己作为客户端来注册它自己,所以需要禁用它的注册行为,只需要在application.properties中添加以下配置:1
2
3
4server.port=1111
eureka.client.register-with-eureka=false
eureka.client.fetch-registry=false
eureka.client.serviceUrl.defaultZone=http://localhost:${server.port}/eureka/
第二、第三行把默认注册行为设置为false,第四行设置注册中心的地址。
启动工程后,访问:http://localhost:1111/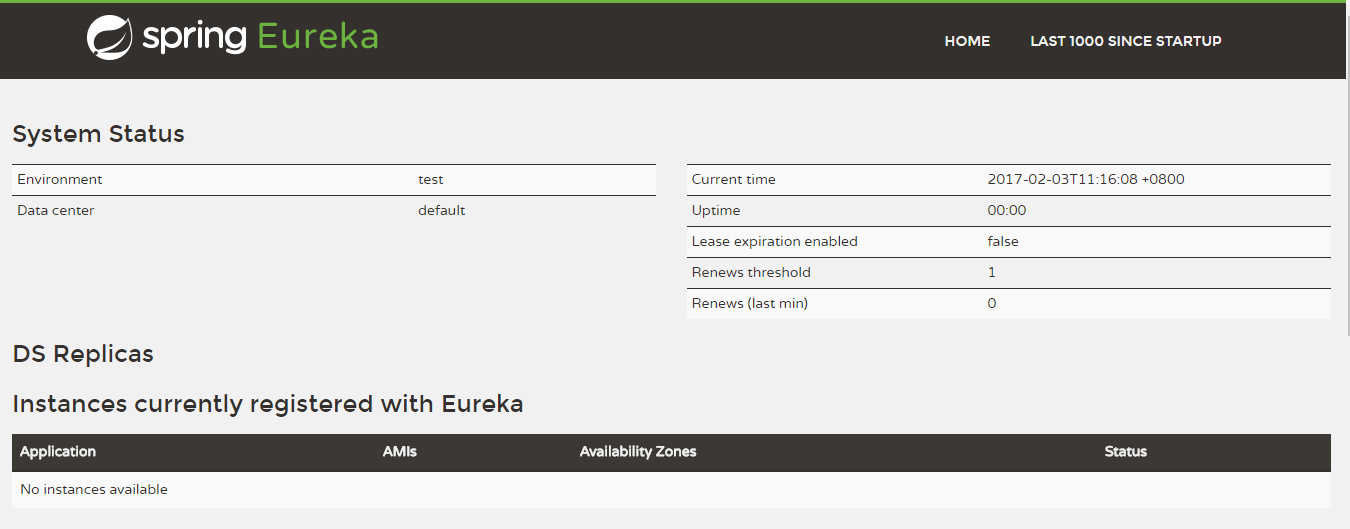
可以看到目前还没有发现任何服务。
创建服务提供方
创建一个提供服务的客户端,并向服务注册中心注册,即对外发布服务。
假设我们有一个提供计算功能的微服务模块,通过传入两个参数a和b,计算a+b的结果并返回。
首先,创建一个基础的Spring Boot工程,这里命名为srpingcloud-service,并在pom.xml文件中添加以下依赖:1
2
3
4
5
6
7
8
9
10
11
12
13
14
15
16
17
18
19
20
21
22
23
24
25
26
27
28<parent>
<groupId>org.springframework.boot</groupId>
<artifactId>spring-boot-starter-parent</artifactId>
<version>1.3.5.RELEASE</version>
<relativePath/> <!-- lookup parent from repository -->
</parent>
<dependencies>
<dependency>
<groupId>org.springframework.boot</groupId>
<artifactId>spring-boot-starter-test</artifactId>
<scope>test</scope>
</dependency>
<dependency>
<groupId>org.springframework.cloud</groupId>
<artifactId>spring-cloud-starter-eureka</artifactId>
</dependency>
</dependencies>
<dependencyManagement>
<dependencies>
<dependency>
<groupId>org.springframework.cloud</groupId>
<artifactId>spring-cloud-dependencies</artifactId>
<version>Brixton.RELEASE</version>
<type>pom</type>
<scope>import</scope>
</dependency>
</dependencies>
</dependencyManagement>
其次,创建一个controller,简单实现/add接口:1
2
3
4
5
6
7
8
public class ComputeController {
(value = "/add" ,method = RequestMethod.GET)
public Integer add(@RequestParam Integer a, @RequestParam Integer b) {
Integer r = a + b;
return r;
}
}
要向注册中心注册服务,只需在启动类中添加@EnableDiscoveryClient注解:1
2
3
4
5
6
7
public class ComputeServiceApplication {
public static void main(String[] args) {
new SpringApplicationBuilder(ComputeServiceApplication.class).web(true).run(args);
}
}
最后,需要配置微服务的名称和注册中心的地址:1
2
3spring.application.name=compute-service
server.port=2222
eureka.client.serviceUrl.defaultZone=http://localhost:1111/eureka/
通过spring.application.name属性,我们可以指定微服务的名称后续在调用的时候只需要使用该名称就可以进行服务的访问。eureka.client.serviceUrl.defaultZone属性对应服务注册中心的配置内容,指定服务注册中心的位置。
启动该工程后,再次访问:http://localhost:1111/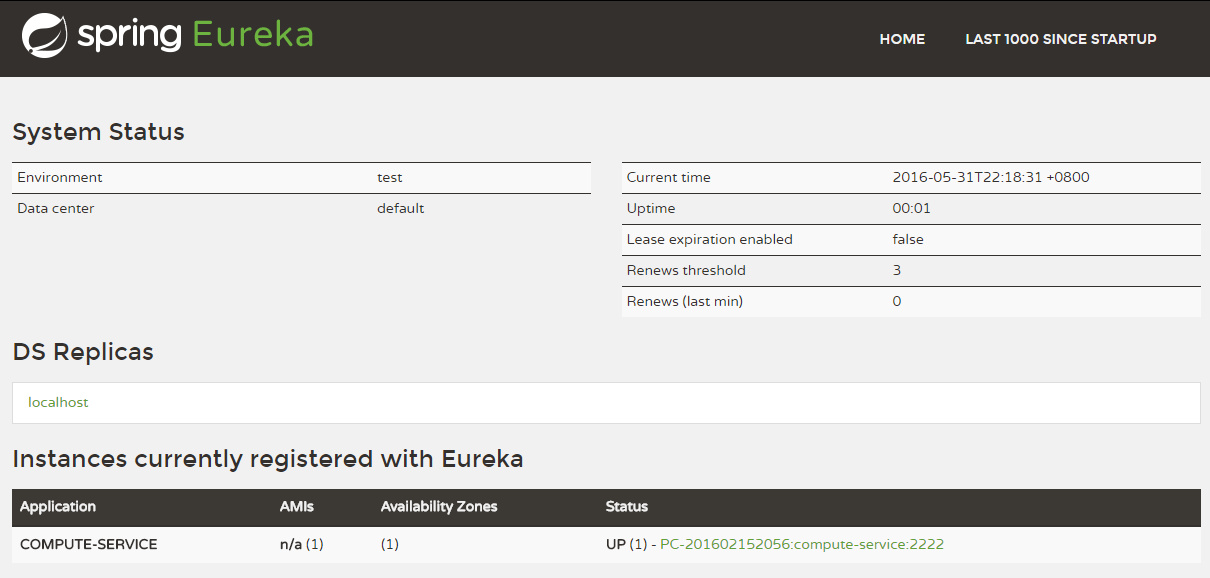
可以看到,COMPUTE-SERVICE的服务已经被注册了。
创建服务消费方
Spring Cloud中有两种方式可以消费服务,Ribbon和Feign。
使用Ribbon实现消费者
Ribbon是一个基于HTTP和TCP客户端的负载均衡器,可以在通过客户端中配置的ribbonServerList服务端列表去轮询访问以达到负载均衡的作用。
当Ribbon与Eureka联合使用时,ribbonServerList会被DiscoverEnabledNIWSServerList重写,扩展成从Euraka注册中心中获取服务端列表,因此在Srping Cloud中,我们只需简单配置即可使用Ribbon消费服务。
创建一个基础的Spring Boot工程,并在pom.xml文件中添加以下依赖:
1 | <parent> |
在启动类中,通过@EnableDiscoveryClient注解来添加发现服务的能力。创建RestTemplate实例,并通过@LoadBalanced注解来开启负载均衡。
1 |
|
创建ConsumerController来消费COMPUTE-SERVICE的add服务。通过注入RestTemplate来调用服务:
1 |
|
最后,在application.properties中配置Eureka注册中心:1
2
3spring.application.name=ribbon-consumer
server.port=3333
eureka.client.serviceUrl.defaultZone=http://localhost:1111/eureka/
访问消费端的add接口,即可看到返回结果。
使用Feign实现消费者
Feign是一个声明式的Web Service客户端,它使得编写Web Serivce客户端变得更加简单。
我们只需要使用Feign来创建一个接口并用注解来配置它既可完成。它具备可插拔的注解支持,包括Feign注解和JAX-RS注解。
Feign也支持可插拔的编码器和解码器。Spring Cloud为Feign增加了对Spring MVC注解的支持,还整合了Ribbon和Eureka来提供均衡负载的HTTP客户端实现。
创建一个基础的Spring Boot工程,并在pom.xml文件中添加以下依赖:1
2
3
4
5
6
7
8
9
10
11
12
13
14
15
16
17
18
19
20
21
22
23
24
25
26
27
28
29
30
31
32
33
34
35
36<parent>
<groupId>org.springframework.boot</groupId>
<artifactId>spring-boot-starter-parent</artifactId>
<version>1.3.5.RELEASE</version>
<relativePath/> <!-- lookup parent from repository -->
</parent>
<dependencies>
<dependency>
<groupId>org.springframework.cloud</groupId>
<artifactId>spring-cloud-starter-feign</artifactId>
</dependency>
<dependency>
<groupId>org.springframework.cloud</groupId>
<artifactId>spring-cloud-starter-eureka</artifactId>
</dependency>
<dependency>
<groupId>org.springframework.boot</groupId>
<artifactId>spring-boot-starter-web</artifactId>
</dependency>
<dependency>
<groupId>org.springframework.boot</groupId>
<artifactId>spring-boot-starter-test</artifactId>
<scope>test</scope>
</dependency>
</dependencies>
<dependencyManagement>
<dependencies>
<dependency>
<groupId>org.springframework.cloud</groupId>
<artifactId>spring-cloud-dependencies</artifactId>
<version>Brixton.RELEASE</version>
<type>pom</type>
<scope>import</scope>
</dependency>
</dependencies>
</dependencyManagement>
在启动类中通过@EnableFeignClients注解来开启Feign功能:1
2
3
4
5
6
7
8
public class FeignApplication {
public static void main(String[] args) {
SpringApplication.run(FeignApplication.class, args);
}
}
定义compute-service服务提供的接口:1
2
3
4
5("compute-service")
public interface ComputeClient {
(method = RequestMethod.GET, value = "/add")
Integer add(@RequestParam(value = "a") Integer a, @RequestParam(value = "b") Integer b);
}
- 使用
@FeignClient("compute-service")注解来绑定该接口对应的服务; - 通过Spring MVC的注解来配置服务的具体实现;
最后,在Controller中注入ComputeClient,即可消费服务:1
2
3
4
5
6
7
8
9
public class ConsumerController {
ComputeClient computeClient;
(value = "/add", method = RequestMethod.GET)
public Integer add() {
return computeClient.add(10, 20);
}
}
application.properties的配置与使用Ribbon时相同,指定Eureka注册中心即可。